If the fender liner fell off your car, it is important to replace it promptly. In addition to protecting the wheel well and fender from debris, the fender liner also helps improve aerodynamics and prevents corrosion.
Without a functioning fender liner, your vehicle’s components may be exposed to potential damage from rocks, water, and other road debris. To ensure proper fit and function, it is recommended to consult your vehicle’s manual or seek professional assistance for the replacement process.
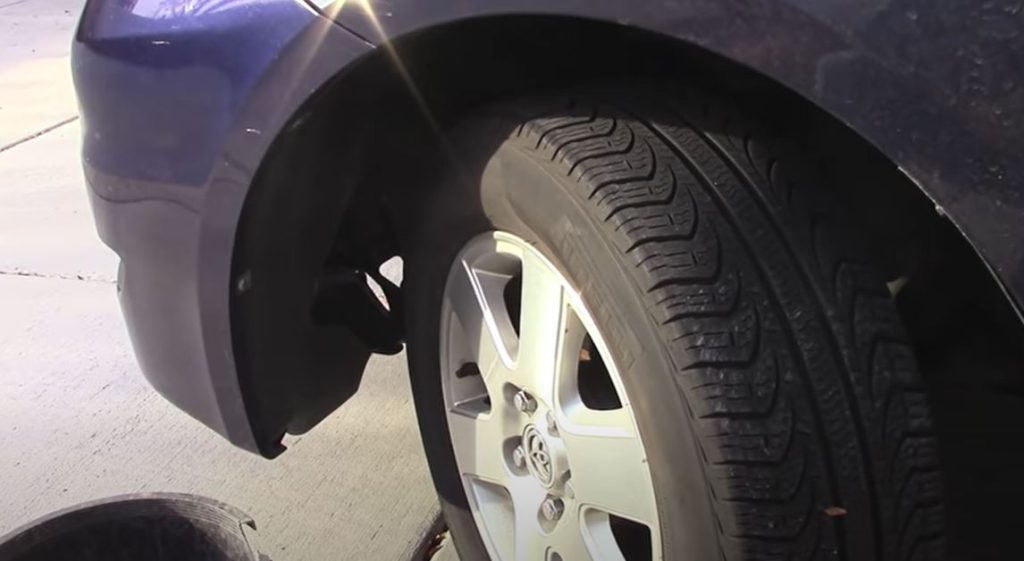
Understanding The Fender Liner And Common Causes Of Damage
Understanding the Fender Liner and Common Causes of Damage: Discover why fender liners can fall off and the usual culprits behind their damage. Find out how to prevent and address these issues to maintain your vehicle’s integrity.
What Is A Fender Liner And Its Purpose
A fender liner, also known as a wheel well liner or splash guard, is an essential component of your vehicle’s fender. It is a protective barrier made of plastic or rubber that lines the inner side of the wheel well, located between the fender and the tire.
The primary purpose of a fender liner is to shield the wheel well and other vital components from dirt, gravel, water, and debris that may be kicked up by the rotating tires.
Read More: GMC Sierra interior lights that won’t turn off
Importance Of A Well-Maintained Fender Liner
A well-maintained fender liner plays a crucial role in safeguarding your vehicle in multiple ways:
- Protection from corrosion: The fender liner acts as a barrier against moisture, preventing it from accumulating in the wheel well. This helps to minimize the risk of corrosion and rust formation on the inner parts of your vehicle.
- Prevention of damage: By keeping dirt, rocks, and other debris at bay, a fender liner helps safeguard not only the fender but also other vulnerable parts such as the suspension components, brake lines, and electrical wiring. This protection can extend the lifespan of these crucial components and save you from expensive repairs.
- Enhanced aerodynamics: A properly fitted fender liner optimizes the airflow around the wheel well. This streamlining effect improves the vehicle’s overall aerodynamics, reducing drag and potentially enhancing fuel efficiency.
- Reduced road noise: Fender liners act as noise barriers, dampening the sound generated by the rotating tires. This can lead to a more pleasant and quieter driving experience, especially on highways or rough roads.
Common Causes Of Fender Liner Damage
Fender liners are subject to wear and tear, and several factors can lead to their damage. Here are some common causes:
- Road debris impact: Rocks, gravel, and other objects on the road can be flung into the wheel well, causing the fender liner to crack or even detach. This is more likely to occur if you frequently drive on uneven or unpaved roads.
- Accidental damage: Scraping against curbs, speed bumps, or other obstacles can result in fender liner damage. A momentary lapse in judgement while parking or maneuvering can lead to such accidents.
- Aging and deterioration: Over time, fender liners may degrade due to exposure to harsh weather conditions, UV rays, and temperature fluctuations. This can make them brittle and prone to cracking or breaking.
- Improper installation: If not installed correctly during manufacturing or replacement, fender liners may not be securely fastened. This can make them vulnerable to damage or detachment, especially in challenging driving conditions.
- High-speed impact: Collisions or accidents at high speeds can cause significant damage to the fender liners, often requiring immediate replacement.
Understanding the purpose of a fender liner and the common causes of damage can help you appreciate its importance in protecting your vehicle. Regular inspection and maintenance of your fender liners can help ensure they remain intact and functional, minimizing the risk of further damage to your vehicle’s vital components.
Read More: Fix a wheel pushed back into the fender | Easy step need to follow
Step 1: Assessing The Damage And Gathering The Necessary Tools
Start by assessing the damage caused by your fender liner falling off and gather the necessary tools to fix it. With a careful examination and proper equipment, you’ll be able to address the issue effectively.
Examining The Extent Of The Damage:
When it comes to your fender liner falling off, it’s important to assess the damage before proceeding with any repairs. By examining the extent of the damage, you can determine whether a repair or replacement is necessary. Here are some key points to consider:
- Inspect the fender liner for any signs of damage, such as cracks, tears, or missing pieces. This will help you understand the severity of the issue and the level of repair needed.
- Check the attachment points where the fender liner connects to the vehicle. Look for any broken clips or fasteners that may have caused the liner to come loose.
- Examine the surrounding areas for any signs of impact or collision that could have caused the fender liner to fall off. This will give you a better understanding of the underlying cause.
Identifying The Tools Needed For The Repair:
Before you begin repairing your fender liner, it’s essential to gather the necessary tools. Having the right tools on hand will make the process smoother and more efficient. Here are the tools you’ll need:
- Screwdriver: A flathead or Phillips head screwdriver may be required to remove screws or fasteners that secure the fender liner in place.
- Pliers: Pliers can come in handy when dealing with clips or fasteners that need to be detached or reattached.
- Cordless drill: If you’re dealing with stubborn or corroded screws, a cordless drill with the appropriate drill bit can help remove them more easily.
- Socket set: Depending on your vehicle’s make and model, you may need a socket set to loosen or tighten bolts and nuts.
- Pry tool: A plastic or nylon pry tool can help gently remove the fender liner without causing any damage to surrounding parts.
- Adhesive or zip ties: In some cases, you may need adhesive or zip ties to secure the fender liner back in place if the original attachment points are damaged.
Gathering these tools before you start the repair process will ensure that you have everything you need and prevent any unnecessary delays or frustration.
Remember, assessing the damage and gathering the necessary tools are crucial first steps when dealing with a fallen fender liner. By thoroughly examining the extent of the damage and having the right tools on hand, you’ll be better equipped to tackle the repair process efficiently and effectively.
Step 2: Removing The Damaged Fender Liner
Remove the damaged fender liner in just a few simple steps, ensuring a seamless repair for your fallen off fender liner issue.
When encountering a fallen-off fender liner, it’s crucial to address the issue promptly to prevent further damage to your vehicle. In this step, we will guide you through the process of removing the damaged fender liner safely. By following these steps, you can ensure that your vehicle is ready for a replacement and restore its appearance in no time.
Preparing The Vehicle For Fender Liner Removal:
To get started, you’ll need to prepare the vehicle for fender liner removal. Follow these steps:
- Park your vehicle on a flat and stable surface, ensuring that you have enough space to work around it.
- Turn off the engine and engage the parking brake for added safety.
- Put on a pair of safety goggles and gloves to protect yourself from any debris or sharp edges.
- Gather all the necessary tools required for the removal process, such as a socket wrench, pliers, and screwdrivers.
Once you’ve completed these preparations, you’re ready to move on to the step-by-step guide for safely removing the damaged fender liner.
Step-By-Step Guide To Safely Removing The Damaged Fender Liner:
- Begin by locating the fasteners that secure the damaged fender liner in place. These may include screws, clips, or bolts, depending on your vehicle model.
- Carefully remove the fasteners one by one, using the appropriate tools. Take note of their placement to ensure proper reassembly later.
- Gently pull back the damaged fender liner, starting from the outer edges and working your way towards the center. Exercise caution to avoid any undue force or potential damage to neighboring components.
- If you encounter any stubborn clips or fasteners, use pliers or a flathead screwdriver to carefully pry them loose. Take care not to damage the surrounding areas.
- Once the damaged fender liner is fully detached, inspect the underlying area for any signs of damage or debris. Clean and address any issues before installing the new liner.
- If you plan on replacing the fender liner, take measurements of the damaged liner to ensure a proper fit for the replacement. This step is especially vital if you opt for an aftermarket liner.
- Finally, dispose of the damaged fender liner responsibly or set it aside for any potential repairs if applicable.
Following these step-by-step instructions will allow you to safely and efficiently remove the damaged fender liner from your vehicle. With careful attention to detail, you’ll soon be ready for the next phase of the replacement process. Stay tuned for the next step in our series, where we will guide you through the installation of a new fender liner.
Step 3: Cleaning And Preparing The Fender Area
After the fender liner fell off, it is crucial to clean and prepare the fender area for reinstallation. This important step ensures a smooth and secure fit for the new fender liner.
Importance Of Cleaning The Fender Area Before Installation
Cleaning the fender area is a crucial step before installing a new fender liner. Proper cleaning ensures that the area is free from dirt, debris, and old adhesive, allowing for a secure and long-lasting installation. Here are the reasons why cleaning is essential:
- Ensures proper adhesion: By removing any dirt, grime, or loose debris, you create a clean surface for the new fender liner to adhere to. This promotes optimal adhesion and prevents the liner from falling off again.
- Prevents corrosion: Over time, the accumulation of dirt and moisture can lead to corrosion on the fender area. Thoroughly cleaning the surface helps prevent rusting and extends the lifespan of your vehicle’s fender.
- Enhances aesthetics: Cleaning the fender area improves the overall appearance of your vehicle. It removes stains and unsightly buildup, giving your fender liner installation a clean and professional finish.
Recommended Cleaning Products And Techniques
Now that you understand the importance of cleaning the fender area, it’s essential to know the recommended cleaning products and techniques. Here are some options to consider:
- Mild soap and water: The simplest and most accessible method is to use a mild detergent or automotive soap mixed with water. Apply the soapy solution and gently scrub the fender area with a soft-bristled brush or sponge. Rinse thoroughly with clean water and allow it to dry completely before proceeding.
- Automotive degreaser: If the fender area has stubborn grease or oil buildup, an automotive degreaser can be an effective option. Follow the instructions on the product and use a clean cloth or brush to apply the degreaser. Scrub gently, ensuring the entire area is covered, then rinse off with water and allow it to dry.
- Isopropyl alcohol: For removing adhesive residue from the previous fender liner, isopropyl alcohol is highly recommended. Dampen a cloth with the alcohol and gently wipe the affected area. The alcohol will help dissolve the adhesive, making it easier to remove. Once the residue is gone, clean the area with soap and water, and dry it thoroughly.
- Avoid abrasive cleaners: It’s crucial to avoid abrasive cleaners or rough materials that can scratch or damage the fender area. Opt for gentle cleaning methods to ensure the surface remains intact and undamaged.
Remember, always refer to the manufacturer’s instructions and recommendations for cleaning products specific to your vehicle’s fender materials.
Preparing The Fender Area For The New Fender Liner
After cleaning the fender area, it’s time to prepare it for the installation of the new fender liner. Follow these steps to ensure a proper fit and secure attachment:
- Inspect and remove old fasteners: Carefully inspect the fender area for any remaining fasteners from the previous fender liner. Remove them using appropriate tools to ensure a clean surface for the new installation.
- Align the new fender liner: Before attaching the new fender liner, align it with the fender area to ensure a proper fit. Check if any modifications, trimming, or adjustments are needed based on the liner’s design and your vehicle’s specifications.
- Test-fit and adjust: Prior to the final installation, perform a test fit of the new fender liner to ensure it aligns perfectly with the fender area. Make any necessary adjustments such as trimming excess material or bending tabs to achieve an optimal fit.
- Secure the fender liner: Once you’re satisfied with the test fit, secure the new fender liner in place. Follow the manufacturer’s instructions for the appropriate attachment method, whether it involves clips, screws, or adhesive. Ensure each attachment point is properly fastened to prevent any future issues.
By cleaning and preparing the fender area before installing the new fender liner, you ensure a successful and long-lasting restoration process. Take your time, follow the recommended techniques, and enjoy the finished result – a securely attached fender liner that enhances both the functionality and aesthetics of your vehicle.
Step 4: Installing The New Fender Liner
In Step 4, learn how to install a new fender liner after it fell off. Follow the guidelines carefully to ensure proper installation for optimal vehicle protection.
Choosing The Appropriate Replacement Fender Liner
When it comes to choosing the right replacement fender liner for your vehicle, there are a few factors to consider. Here are some points to keep in mind:
- Vehicle compatibility: Ensure that the replacement fender liner is specifically designed for your make and model of vehicle. This will ensure a proper fit and functionality.
- Material: Fender liners come in different materials such as plastic, rubber, or metal. Consider the climate and driving conditions in your area to determine which material will offer the best protection and durability.
- OEM vs. Aftermarket: Decide whether you want to stick with an Original Equipment Manufacturer (OEM) fender liner or opt for an aftermarket one. OEM fender liners are designed by the manufacturer and offer a guaranteed fit, while aftermarket options are often more cost-effective but may require some modifications for proper installation.
- Quality and reviews: Read customer reviews and testimonials to gauge the quality and performance of different fender liner options. Look for ones that have positive feedback regarding fitment, durability, and overall satisfaction.
Step-By-Step Guide To Installing The New Fender Liner
Installing a new fender liner may seem daunting, but with the right tools and instructions, it can be a manageable task. Follow these steps to ensure a successful installation:
- Prepare the area: Park your vehicle on a flat surface and ensure that the engine is turned off. Open the hood and disconnect the negative battery terminal to avoid any electrical mishaps.
- Remove the damaged fender liner: Use a screwdriver or a socket wrench to remove any screws, clips, or bolts holding the damaged fender liner in place. Gently pull it away from the fender, being careful not to damage any surrounding components.
- Clean the fender: Take the opportunity to clean the fender and surrounding area before installing the new fender liner. This will help ensure proper fitment and prevent any debris or dirt from accumulating.
- Align the new fender liner: Position the new fender liner in place, aligning the screw holes and clips with the corresponding points on the fender. Be patient and take your time to ensure proper alignment before moving forward.
- Secure the new fender liner: Once the fender liner is properly aligned, use the screws, clips, or bolts that came with the new fender liner to secure it in place. Tighten them gently, ensuring not to over-tighten and risk damaging the fender or liner.
- Test the fitment: After securing the new fender liner, give it a gentle tug to ensure that it is properly fitted and doesn’t move or rattle. This step will help verify that the installation was successful.
Tips For Proper Alignment And Secure Installation
To ensure a smooth and secure installation of the new fender liner, keep the following tips in mind:
- Refer to the vehicle’s manual: If you’re unsure about any step or component, consult your vehicle’s manual for specific instructions and diagrams related to the fender liner installation process.
- Have a helper: Having an extra pair of hands can make the installation process easier and safer, especially when aligning and securing the fender liner.
- Take before and after photos: Before removing the old fender liner, take some photos to serve as a reference during the installation of the new one. This will help you remember the proper positioning and alignment of various components.
- Inspect and replace additional components: While removing the old fender liner, inspect the surrounding components for any signs of damage or wear. If necessary, replace any clips, screws, or bolts that are worn or broken to ensure a secure installation.
- Double-check the alignment: Before finalizing the installation, double-check the alignment of the fender liner to ensure that it is visually aligned with the fender and surrounding components. This will not only enhance the aesthetic appeal but also improve functionality.
Remember, proper installation of the new fender liner is crucial for maintaining the structural integrity of your vehicle and protecting it from debris, dirt, and other elements. Taking the time to choose the appropriate replacement and following the step-by-step guide will ensure a successful installation process.

Credit: www.carfax.com
Step 5: Preventing Future Fender Liner Damage
Learn how to prevent future damage to your fender liner with step 5 of our guide. Protect your car from experiencing another fender liner fallout with these expert tips.
Best Practices For Fender Liner Maintenance And Care:
- Clean the fender liner regularly to prevent dirt buildup and debris accumulation.
- Use a mild soap and water solution to gently scrub away any grime or stains.
- Avoid using abrasive cleaners or harsh chemicals that could damage the liner material.
- Inspect the fender liner for signs of wear or damage, such as cracks or tears.
- Replace the fender liner if necessary to maintain optimal protection for your vehicle.
Tips For Preventing Common Causes Of Fender Liner Damage:
- Avoid driving over rough or uneven terrain that could cause the liner to scrape or get caught on objects.
- Be mindful of parking near curbs or obstacles that could potentially impact the fender liner.
- Slow down and drive cautiously to minimize the risk of hitting potholes, speed bumps, or other road hazards that could cause damage.
- Consider adding mud flaps or splash guards to your vehicle to provide additional protection for the fender liner.
- Pay attention to any unusual noises or vibrations while driving, as these could be signs of fender liner damage.
Regular Inspections And Proactive Measures To Ensure Longevity:
- Schedule regular inspections of your fender liner, especially after driving in challenging conditions or off-road.
- Promptly address any damage or wear discovered during inspections to prevent further deterioration.
- Apply a protective spray or coating to the fender liner to enhance its durability and resistance to environmental damage.
- Secure the fender liner properly during installation to prevent it from becoming loose or detached while driving.
- Research and follow the manufacturer’s recommendations for fender liner care and maintenance.
Frequently Asked Questions For Fender Liner Fell Off
Is It Ok To Drive Without Inner Fender Liner?
Driving without an inner fender liner is generally not recommended as it protects your vehicle’s components from dirt, debris, and moisture.
What Holds The Fender Liner?
The fender liner is held in place by clips, screws, or bolts.
How Much Is It To Fix A Broken Fender Liner?
The cost of fixing a broken fender liner can vary depending on the make and model of the vehicle.
Can I Drive Without Wheel Arch Cover?
No, it is not recommended to drive without a wheel arch cover.
Conclusion
The fender liner falling off can be a common issue that many drivers face. It is important to address this problem promptly to prevent potential damage to the vehicle. By regularly inspecting the fender liner and ensuring it is securely fastened, drivers can avoid the inconvenience of the liner coming loose while driving.
Understanding the purpose of the fender liner and its role in protecting the undercarriage and suspension components is key to maintaining the overall condition of the vehicle. Taking proactive measures such as installing aftermarket fender liners or seeking professional assistance can also help prevent future issues.
Stay vigilant and keep an eye out for any signs of a loose or damaged fender liner to ensure a safe and smooth driving experience. Trustworthy and reliable auto shops can provide the necessary repairs and replacements to keep your vehicle’s fender liner intact.
Drive with confidence knowing that your fender liner is in optimal condition to protect your vehicle.
Hi, my name is Michel Luther. I am the owner of smartautohq.com website. I have been working in the automotive industry, especially in the car part nearly 7 years. So, I want to help you with this matter whatever I know