
If you notice antifreeze leaking under your car on the driver side, it is important to address this issue immediately to prevent further damage. Antifreeze leaks can lead to engine overheating and other serious issues.
Additionally, driving with a leaking antifreeze can be dangerous for both you and your vehicle.
Reasons For Antifreeze Leaking Under Car Driver Side
Antifreeze leaking under the car driver side can occur due to a faulty radiator hose, water pump, or radiator. It is essential to address this issue promptly to prevent engine damage and overheating.
A leaking antifreeze can be a concerning issue for any vehicle owner. If you notice a pool of antifreeze forming under your car’s driver side, it is important to identify the underlying causes promptly. In this section, we will explore the three most common reasons for antifreeze leakage and how they can affect your vehicle.
Damaged Radiator Hose:
A damaged radiator hose is a frequent culprit of antifreeze leaks. To quickly address cracks or holes in the radiator hose, consider using a reliable radiator hose repair kit featuring high-quality materials for enhanced durability and future leak prevention.

- F4 Tape is manufactured to military and aviation standards. The new rapid fuse technology, high tensile strength, high-temperature resistance and high-performance, significantly exceeds the Mil Specifications for self-fusing silicone tape
- The new fusing silicone formula fuses in seconds and bonds to itself permanently. Better elasticity and better elastic memory. Easier to separate from the plastic liner. Thorough fusion without the need to clamp or tie the ends
- Resists pressure up to 950 PSI and insulates up to 8,000 volts. Withstands constant operating temperatures of -85F degrees and resists up to 500F degrees. Resistance to oils, fuels, and many chemicals. Refer to Product Description for instructions for proper use
- Insulate and protect wiring and connections. Waterproof connections and fittings. Replace shrink tape and shrink tubing. Wrap wires for safety and protection. Wrap tool handles, aircraft handles and knobs for a non-slip grip and emergency repairs on lines and hoses
- F4 Tape is lab tested and manufactured in the USA with extruded of a high-performance silicone elastomer. Available in the traditional military Red Oxide or Black color with blue guideline. Each roll is 1" wide x 36' long x .020" (20mil) thick
The hose can deteriorate over time due to wear and tear, leading to cracks or holes. Here are a few key points to consider:
- Cracks or holes in the radiator hose can result in antifreeze leakage.
- Age, exposure to extreme temperatures, and regular usage can contribute to hose deterioration.
- Inspect the hose visually for any signs of damage, such as bulges, cracks, or soft spots.
- When replacing a damaged radiator hose, consider using high-quality materials to ensure durability and prevent future leaks.
Faulty Water Pump:
The water pump plays a crucial role in distributing coolant throughout the engine. A malfunctioning water pump can lead to antifreeze leaks. Consider the following:
- A worn-out or damaged water pump can cause leaks in the antifreeze system.
- Look for signs such as coolant pooling near the water pump or unusual sounds coming from the engine area.
- Addressing water pump issues promptly can prevent further damage to the engine and potential overheating.
Cracked Engine Block:
A cracked engine block is a serious issue that can result in antifreeze leakage. For a comprehensive diagnosis of potential engine block issues, an engine block leak tester kit can help identify the presence of combustion gases, indicating a cracked engine block that requires immediate attention.
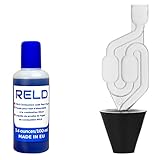
- The original head gasket tester kit of the reputable brand “RELD”
- Produced in the European Union. The efficiency is 99.9%.
- Fast and convenient. Most importantly you can check whether the head gasket of your car is fully functional without visiting the mechanic.
- If the head gasket looks damaged, you can check it yourself and save time and money.
- Thanks to the universal adapter with a wide measuring range (25-55 mm), we can check among other things: cars, trucks, road tractors, excavators, motorcycles and forklifts.
It can occur due to various reasons, such as:
- Extreme temperature changes can cause the engine block to crack, leading to antifreeze leaks.
- Overheating can weaken the engine block, making it more susceptible to cracking.
- Look for signs like white smoke from the exhaust or an overheated engine, as they can be indicative of a cracked engine block.
- In such cases, professional assistance is essential to assess the severity of the damage and determine the best course of action.
Remember, promptly addressing any signs of antifreeze leakage is crucial to prevent further damage to your vehicle’s engine and coolant system. If you are unsure about identifying or resolving the issue, consulting a qualified mechanic is always a wise decision.
Stay proactive and maintain a well-functioning cooling system to ensure your vehicle’s optimal performance and longevity.
Related Article: Driver Side Floor Invaded by Leaking Coolant
Credit: www.startrescue.co.uk
Signs And Symptoms Of Antifreeze Leak
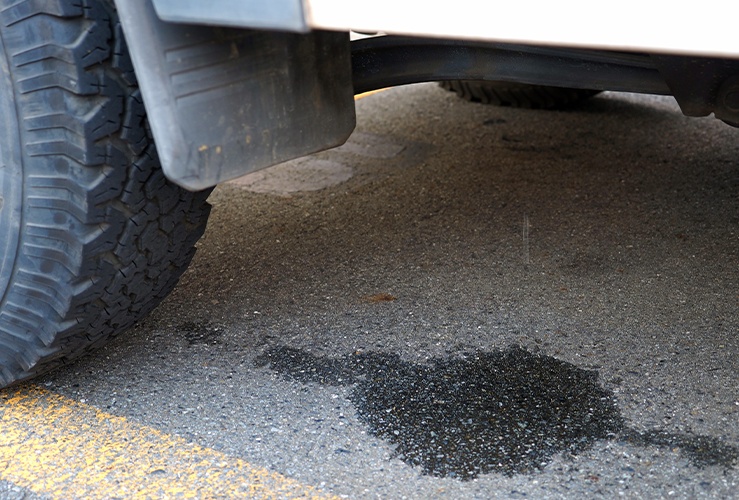
Antifreeze leaking under the car driver side can be indicated by signs like puddles of liquid under the vehicle, a sweet smell, higher engine temperature, and low coolant levels. It’s important to address this issue promptly to avoid engine damage.
If you’ve been noticing a sweet, pungent smell inside your car, puddles of coolant under the car, or an overheating engine, you may be experiencing an antifreeze leak. Recognizing the signs and symptoms of an antifreeze leak is crucial in addressing the issue before it escalates.
Here are some indicators to watch out for:
- Coolant smell inside the car: A distinct coolant smell permeating the interior of your car indicates a potential antifreeze leak. This odor can be easily identified and is often described as sweet or syrupy.
- Puddles of coolant under the car: If you notice puddles of brightly colored liquid, typically green or orange, forming underneath your car, it is likely that there is an antifreeze leak. These puddles may appear after the vehicle has been parked for some time.
- Overheating engine: Antifreeze is responsible for regulating engine temperature. If there is a leakage, the coolant level can drop, leading to an overheating engine. Pay attention to your dashboard temperature gauge and any warning lights that may indicate an increase in temperature.
These signs and symptoms should not be ignored, as prolonged antifreeze leaks can result in significant engine damage. It is crucial to address the issue promptly to avoid costly repairs and potential breakdowns.
Troubleshooting Antifreeze Leak
If you notice antifreeze leaking under your car on the driver’s side, it could be a sign of trouble. Addressing this issue promptly can help prevent engine overheating and potential damage. Check hoses, fittings, and the radiator to determine the source of the leak and take necessary steps to fix it. For DIY enthusiasts, a DIY coolant system pressure tester is a handy tool to pressurize the cooling system, making it easier to pinpoint the source of antifreeze leaks during inspections.

- Unit is suitable for domestic and import vehicles
- Special design of vacuum purge and refill tool connection fits nearly all types of radiator openings
- Blow molded case
Antifreeze leaks can be a cause for concern for any car owner. Not only can they lead to potential engine damage, but they can also present a safety hazard. If you’ve noticed antifreeze leaking under your car on the driver side, it’s important to take action and troubleshoot the issue promptly.
In this section, we will explore the key steps to troubleshooting an antifreeze leak, helping you identify the potential culprits and take appropriate measures to resolve the problem.
Inspect The Radiator Hose:
- Check the radiator hose for any signs of cracks, bulges, or leaks.
- Look for any visible coolant stains or puddles near the hose connection points.
- Ensure that the hose clamps are tight and secure.
Check For Cracks Or Bulges:
- Inspect the entire length of the radiator hose for cracks or bulges.
- Pay close attention to areas where the hose bends or connects to other components.
- Keep an eye out for wet or moist spots on the hose, which may indicate a leak.
Replace If Necessary:
- If you detect any cracks or bulges on the radiator hose, it is recommended to replace it.
- Consult your vehicle’s manual or seek professional assistance to ensure you choose the correct replacement hose.
- Thoroughly clean any coolant spills or residue before installing the new hose.
Examine The Water Pump:
- Carefully inspect the water pump for any signs of leaks or corrosion.
- Look for coolant stains or dampness around the water pump housing.
- Check the weep hole located on the pump for any coolant drips or traces.
Look For Leaks Or Corrosion:
- Check all connections and seals around the water pump for any signs of leaks.
- Inspect the pump for any noticeable corrosion, which can weaken its performance.
- Ensure that the water pump pulley is secure and free from any damage.
Replace If Needed:
- If you identify any leaks or significant corrosion on the water pump, it is recommended to replace it.
- Consult a professional mechanic or refer to your vehicle’s manual for proper replacement procedures.
- Thoroughly drain and flush the cooling system before installing the new water pump.
Inspect The Engine Block:
- Check the engine block for any visible cracks, holes, or signs of damage.
- Look for coolant stains or wet spots near the engine block.
- Examine the freeze plugs for any signs of corrosion or leakage.
Check For Cracks Or Holes:
- Inspect the entire surface of the engine block for cracks or holes, paying attention to vulnerable areas.
- Use a flashlight or mirror to examine hard-to-reach areas and engine block components.
- Keep an eye out for coolant leaks that may indicate a cracked engine block.
Repair Or Replace If Damaged:
- If you find any cracks, holes, or damage on the engine block, it is crucial to get it repaired or replaced promptly.
- Consult a professional mechanic for proper repair procedures or consider replacing the engine block if necessary.
- Be sure to thoroughly clean and flush the cooling system after any repair or replacement work.
Remember, if you’re unsure or uncomfortable with troubleshooting an antifreeze leak yourself, it’s always best to consult a qualified mechanic. They have the expertise to accurately diagnose and address the issue, ensuring the safety and longevity of your vehicle.
Related Article: Coolant Leaking into Driver Side Floor Toyota: What Should You Do?
Diy Fix For Antifreeze Leak
If you notice antifreeze leaking under your car on the driver’s side, you can tackle it as a DIY fix. Start by identifying the source of the leak and inspecting the hose connections. Next, replace any damaged components and ensure a tight seal to resolve the issue effectively.
Stay proactive in maintaining your vehicle to prevent further leaks.
Antifreeze leaks under the car on the driver side can be a frustrating issue to deal with. Not only can it leave a mess behind, but it can also lead to engine problems if left unchecked. Fortunately, there are steps you can take to fix the antifreeze leak yourself and get your car back in working order.
In this section, we will guide you through the process with easy-to-follow instructions.
Gather Necessary Tools And Materials:
- Jack or ramps: To elevate the car and gain access to the coolant system.
- Socket set and wrench: For removing components like the radiator cap and drain plug.
- Drain pan: To catch the coolant as it is drained from the system.
- New component: Depending on the source of the leak, this could be a hose, radiator, water pump, or thermostat.
- Coolant: Ensure you have the correct type and enough quantity to refill the system.
Drain The Coolant System:
- Park the car on a level surface and engage the parking brake.
- Put on safety goggles and gloves to protect yourself.
- Locate the drain plug at the bottom of the radiator or the engine block.
- Place the drain pan underneath the drain plug.
- Loosen the drain plug to allow the coolant to flow into the pan.
- Once the coolant has fully drained, tighten the drain plug securely.
Replace The Damaged Component:
- Identify the specific component causing the antifreeze leak.
- Use the appropriate tools to remove the damaged component.
- Clean the area around the component to ensure a proper seal with the new part.
- Install the new component and tighten any fasteners as necessary.
- Double-check that the component is securely in place.
Refill The Coolant System:
- Locate the radiator cap or coolant reservoir.
- Remove the radiator cap or open the reservoir.
- Slowly pour the coolant into the system until it reaches the recommended level.
- Allow any air pockets to escape by squeezing the radiator hoses or using a coolant funnel.
- Recap or close the reservoir securely.
Check For Leaks And Test Drive:
- Start the engine and let it run for a few minutes.
- Inspect the area where the leak was previously occurring for any signs of new leaks.
- Watch for any changes in the temperature gauge or unusual noises.
- Take a short test drive to ensure the repair was successful.
- Monitor the coolant level and temperature during and after the test drive.
By following these steps, you can tackle the antifreeze leak under your car’s driver side on your own. Remember to exercise caution and take your time to ensure a proper repair. If you are uncertain about any of the steps or the source of the leak, it is always best to consult a professional mechanic for assistance.
Professional Fix For Antifreeze Leak
Discover a professional solution to fix antifreeze leaks under the driver side of your car. Get your vehicle back on track with expert repair services for this common issue.
Antifreeze leaks can be a common issue that drivers encounter, and finding a professional fix is crucial to keeping your car running smoothly. Consulting a certified mechanic is the first step in resolving this problem, as they have the expertise and knowledge to diagnose and repair the issue effectively.
Let’s explore the professional fix for an antifreeze leak in more detail:
Consult A Certified Mechanic:
- Visiting a certified mechanic is essential to ensure that the antifreeze leak is accurately diagnosed and resolved.
- Mechanics have the expertise to identify the exact cause of the leak and provide suitable solutions.
- They can perform diagnostic tests and inspections to pinpoint the source of the leak, preventing any further damage to your vehicle.
- Certified mechanics are trained in working with antifreeze systems and have the necessary tools to fix the issue efficiently.
Diagnostic Tests And Inspections:
- A certified mechanic will conduct various diagnostic tests to assess the condition of your car and identify the cause of the antifreeze leak.
- These tests may include a visual inspection, pressure test, or the use of specialized equipment to locate the exact source of the leak.
- By conducting thorough inspections, mechanics can determine any additional damage caused by the leak and identify potential areas of concern.
Professional Repair Or Replacement:
- Once the source of the antifreeze leak is identified, a certified mechanic will provide the necessary repairs or replacements.
- They may fix the leak by repairing a damaged hose or radiator, replacing a faulty gasket, or addressing any other issues found during the inspection.
- If the damage is extensive or irreparable, the mechanic may recommend replacing the affected part to ensure long-term reliability.
Quality Assurance And Warranty:
- When consulting a certified mechanic, you can expect quality assurance and warranty on the repairs performed.
- Mechanics strive to provide exceptional service and stand behind their work, ensuring that the antifreeze leak is resolved effectively.
- The warranty serves as a guarantee, giving you peace of mind that any potential issues related to the repair will be covered.
A professional fix for an antifreeze leak requires consulting a certified mechanic who can conduct diagnostic tests, perform necessary repairs or replacements, and provide quality assurance and warranty. Trusting the expertise of a trained professional will help ensure that your car is back on the road, free from antifreeze leaks and any associated risks.
Preventing Future Antifreeze Leaks
Prevent future antifreeze leaks under your car driver side with these effective tips and techniques. Keep your vehicle running smoothly and avoid costly repairs. Stay proactive and maintain the integrity of your vehicle’s cooling system.
Regular maintenance and inspections:
- Conduct regular inspections of your vehicle’s cooling system to detect any signs of antifreeze leaks.
- Look for puddles or stains underneath the car, especially on the driver side, as this may indicate a leakage.
- Keep an eye on the coolant level and temperature gauge to identify any abnormal changes that might suggest a leak.
- Pay attention to any unusual smells or steam coming from under the hood, as this could be a sign of a coolant leak.
- Regularly check the radiator, hoses, and water pump for any cracks, leaks, or signs of wear and tear.
- Inspect the radiator cap, ensuring it is secure and in good condition, as a faulty cap can lead to coolant leaks.
- Consider scheduling regular maintenance appointments with a professional mechanic to have your cooling system inspected and serviced.
Replace coolant as recommended:
- Follow the manufacturer’s recommendations for coolant replacement intervals. Typically, coolant should be replaced every two to five years or as specified in your vehicle’s manual.
- Use the recommended type of coolant specified by the manufacturer to ensure compatibility with your vehicle’s cooling system.
- When replacing coolant, ensure that the system is properly flushed to remove any old or contaminated coolant, as this can contribute to leaks.
Properly maintain the cooling system:
- Keep the cooling system clean by periodically flushing the system to remove any debris or contaminants that can cause blockages or damage.
- Check the condition of the hoses and belts, and replace them if they show signs of deterioration or wear.
- Regularly monitor the coolant level and top it up when necessary, following the instructions provided by the manufacturer.
- Maintain the proper pressure in the cooling system by ensuring that the radiator cap is functioning correctly.
- Follow the recommended maintenance schedule for your vehicle to address any potential issues before they escalate into major problems.
By following these preventive measures and staying proactive, you can significantly reduce the chances of experiencing antifreeze leaks on the driver side of your car. Regular maintenance, timely inspections, and proper coolant replacement are crucial in keeping your cooling system in optimal condition.
Frequently Asked Questions Of Antifreeze Leaking Under Car Driver Side
Why Is My Coolant Leaking Under The Drivers Side Of My Car?
Coolant leaks under the driver’s side of your car may be caused by a damaged radiator or hose. So, you should fix the problem as soon as possible.
Is It Safe To Drive A Car With An Antifreeze Leak?
Driving a car with an antifreeze leak is not safe and should be avoided. You have to fix it first and then you should drive. You can take help from an automotive shop.
What Side Of The Car Does Coolant Leak From?
Coolant can leak from either side of the car, depending on the location of the radiator, water pump, or hoses. I hope that you can understand whatever I said to you.
Why Is My Car Leaking Antifreeze On The Ground?
Your car is leaking antifreeze because there may be a problem with the cooling system.
Conclusion
If you notice antifreeze leaking under your car on the driver side, it is crucial to address the issue promptly. Ignoring this problem could lead to significant damage to your vehicle’s engine and cooling system. First, diagnose the source of the leak by checking for cracked hoses, a faulty water pump, or a leaking radiator.
Once you have identified the cause, consult with a professional mechanic to repair or replace the damaged components. In the meantime, it is important to monitor your coolant levels regularly and top them up as needed. By taking prompt action and ensuring proper maintenance, you can prevent further damage and avoid costly repairs in the future.
Remember, addressing antifreeze leaks promptly will help keep your car running smoothly and efficiently.
Hi, my name is Michel Luther. I am the owner of smartautohq.com website. I have been working in the automotive industry, especially in the car part nearly 7 years. So, I want to help you with this matter whatever I know